

Making a completely new NPC
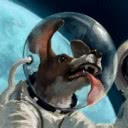
This is not about adding NPC's in mbases.ini or to your ships (though it will touch a little on it in the third part), this is about creating brand new NPC's with different clothes, skin colours and other props (including alien heads) such as can be seen in my example.
This tutorial is in three parts. The first part deals with changes to the dfm (i.e. hands, body and hands). The second part deals with props and constructive uses for them. The third part deals with implementing them into the ini's to include in your mod.
This tutorial does not teach you how to alter the mesh of the hands, body, head etc... This would be a complicated process which involves going through and altering a large number of meshes and trying to get them all to line up correctly. It is theoretically possible, but far more work than is necessary for most people. But what it will do is show people how to create NPC's that appear on the bases that look completely different from the ones you had in Freelancer, including information on building props and changing their costumes. If I miss anything, let me know and I will add it in. I am also going to assume people have at least some knowledge in Freelancer Mod Editting.
The programs you will need are:
The UTF Editor
Milkshape with the CMP exporter and CMP Importer
A decent image editting program that can create TGA files or a converter that will do so from what ever image editting program you use.
BiniQ or a INI Decompresser that will uncompress the ini files and allow you to edit them in notepad.
Hard CMP
Part One - Altering the Head, Hands and Body .dfm files
As most people will know by now, an NPC is made of a number of models. These are normally the Body, the Head, the Hands and one or two props (glasses and hats). The body, the head and the hands are all dfm files, the props are 3db files, all found in the various sub directories inside of the Character directory in Freelancer.
So lets start with editting the look of a head as that is a one piece texture. Find a head which in Freelancer matches the shape of the head you want to create (we won't be editting the shape itself) and copy it to a working folder (I find it easier to have a working folder for doing this sort of stuff). It will be named something like ge_female1_head.dfm and will be found in DATA\CHARACTERS\HEADS. Once you have a copy, open the dfm file up in the UTF Editor.
Suddenly, the dfm looks like a scary place to be in comparrison to a lot of files that you could open up in a UTF editor. However, for this tutorial, lets not worry about most of the stuff (most of it is mesh data dealing with which mesh connects with which mesh at which point). What we are looking for is the good old Texture Library. Opening it up will reveal normally four texture groups which are usually the teeth, the eyes, the highlight of the eyes and the actual head texture. Unless you want to change the teeth and eye textures, don't worry about those for now (if you do want to alter them, the process is the same as for altering the the actual head texture). Open up the head texture tree, normally called something like ge_female1_head02.TGA.
And suddenly, we find that this texture actually has nine levels of detail! This is far more levels of detail than even ships or stations get given in Freelancer. The texture files are labelled MIP0 to MIP8, however, we won't need to extract them all. Select the MIP0 and Export it to your working folder with the file name like example0.tga. IMPORTANT: you must add the .tga tag at the end. It is also advisable to add the 0 at the end of the file name as it will make things a little easier a bit later on.
Right, now you have tga texture file for the face, open it up in your favorite image editting program and.... err... that is one ugly picture! What you should be looking at is a two dimensional texture of the skin that is wrapped around the mesh (basically, it looks like some psycho killer has skinned your poor NPC). Now comes the fun part, altering it.
Using the image as a base, use your texturing know how to alter to your hearts content. Things that you can NOT alter are:
The location of the eye sockets
Where the hair on the head will be
Where the mouth is
Where the ears are
Where the nose is.
These are defined by the shape of the mesh. You could change them in the texture file, but it will look very odd later when applied to the mesh later on. So your work will need to go around these bits. Some ideas of what you could do include:
Change the skin / hair / colour / tone
Add tatoo's or other warpaint markings
Give male faces (and female if you are really odd) stubble, beards and moustaches.
Make other exotic alien markings (for example, if I were making a Star Trek mod, a couple of darker skin lines on the nose ridge could be used to turn the head into a Bajoran head).
Once you have finished making your alterations, save your work and we will now look at creating the nine levels of detail. Each level of detail is a seperate image that is basically smaller than the previous image. The sizes of the various levels of detail are:
MIP0 = 256x265
MIP1 = 128x128
MIP2 = 64x64
MIP3 = 32x32
MIP4 = 16x16
MIP5 = 8x8
MIP6 = 4x4
MIP7 = 2x2
MIP8 = 1x1
As you can see, each level off detail is exactly 50% smaller than the level of detail before it. This makes things so much easier for us. From you original image, scale it down by 50% in your imaging program and save that one as example1.tga (or what ever file name you are using). The use that scaled down version and scale it down by 50% again and save it as example2.tga. Repeat with each one until you reach example8.tga which will be only 1 pixel by 1 pixel across.
IMPORTANT: Do NOT convert your .tga into .dds format. It will not work.
Now we return back to the UTF editor and back to where you exported the tga from to begin with. Selecting MIP0 again in the texture library, click import and import back into it example0.tga. Then select MIP1 and import example1.tga and so on until you have imported all of your tga's into their corresponding MIP's. Now your textures is imported, save the file with a unique file name ending in the .dfm tag at the end (for example, my_head.dfm). Move this head then from your working folder to the Freelancer directory. You could place it in the Heads directory with the rest of the heads, but personnally, I prefer to make a new folder in the Characters directory and put all my custom body parts in there.
Right, before we get onto how to incorporate the body parts into the game's ini files and creating props (which includes more exotic alien heads), lets take a quick look at the other two body parts, hands and bodies.
Hands are relatively simple, just remember there is a left hand and a right hand, though the textures for each set are exactly the same for the left and right hand (even in orientation). The only difference between the two is obviousily the shape. You create your new textures in exactly the same way as you would the head, remembering the basic outline can not be changed. However, the texture you use for one hand can also be used for the other which saves having to do it twice.
Bodies are a little bit more complex to alter but are basically the same as heads again. When you open up a body .dfm in the UTF editor, you will find there are normally three textures. Export the MIP0 of each of these and have a look at all three in your image editting program. You will see that each one deals with a different part of the body. Again, you can't alter the shape of the clothes and the body, but you can alter the appearance. Very handy if you are creating a genre specific mod based on things like Star Trek, Star Wars, Babylon 5, Farscape etc... where the clothing and uniforms have a unique appearance different to those in Freelancer. Using these three images as a base, create your new image with the clothing textures in exactly the same places as they appear in the original texture. You will then need to create the 9 levels of detail as mentioned above for each one and import the 27 textures into the body dfm in the same way.
Just a quick note: I found that in the ku_kym_body_gen.dfm that there is a forth texture which when extracted looks like a head texture. However, the actual face is not important in this body, the mesh just uses the texture to colour the skin that is visible on this body on the upper chest. If you are creating an alien species who has a different skin colour and is going to use this body, you will need to alter the skin colour on this texture as well (and do the nine levels of detail) as I did with my Twi'lek. Otherwise, just leave it alone. There may be more bodies like this as well that I haven't found yet.
Thats it for altering the heads, hands and bodies. Next up, props....
Part Two - Creating Props
Props are something that depending on your point of view is easier or harder to implement than altering the dfm files mentioned above, depending on your modelling experience. Props are an item that can be added to an NPC, allowing further more uniqueness. In the Freelancer files, there are two types of prop that are covered by the Freelancer files:
Hats: This includes Hats and Helmets
Eyewear: This includes glasses, shades, visors, neuralnets and masks.
Both of these props attach to the head and have no seperate animations of thier own, they move where the head moves. This is an important point to remember when creating your props, as any prop that comes too far below the chin can potentially end up moving through the body if the character turns their head or looks up and down. Unfortunately, there doesn't seem to be a prop hardpoint for the hands to make characters hold things. When you see them holding things in the animation cuts, this is programmed directly into the THN and can't be done with the characters normally.
There really is not much difference between hats and eyewear props in how they are they built and applied. The only difference really is a name and where the Hardpoint on the prop attaches to the head. It does allow you to create two different props to attach to the head, but beyond that, there is not much else that makes a difference. I will explain the process for creating a prop here in relation to the hat hardpoint, but if you want to use the Eyewear hardpoint instead, the process is the same.
The first step is to build the item in three dimensions (I normally use Gmax) and import it into Milkshape for texturing. There are plenty of good tutorials here already about building things in Gmax and texturing in Milkshape so I won't go into detail about three dimensional construction except where the process is different from building say a ship or a station. Just bear in mind the shape of the head as you build the item and make sure that the model is done in one group with one texture (I use tga textures, though in this step, dds can be used as well unlike with the body parts).
Once you have your model textured and built in Milkshape (remembering to use unique names for the textures and the group), use the CMP Importer plugin from Milkshape to import one of the already existing props into Milkshape. Use this as a guide to scale and resize your model to the correct proportions. Once you have done that, delete the prop and it's textures you have imported and re-orientate your model so that the top of the prop is pointing to the left in the left projection window and where the face would in relation to the prop, it would be facing upwards (this is a completely different orienatation to what is used for ship models). Scale the model by 100 times (as the CMP Importer will have scaled the prop you used for comparison down by 100 times when you brought it in, unless you manually tell the importer to scale it back to the proper size) and export it with a unique name (I would use the group name) as a CMP file.
Now we need to build ourselves a .3db which we will use for the prop. Using the UTF Editor, open up your CMP file that you just made and find the nodes entitled VMeshData and VMeshRef. Export these with just the name (no file extension). These two nodes contain all the mesh data you need for your prop. Now pick one of the pre-existing props 3db files once again from inside Freelancer and open it up in the UTF editor (I used prop_hat_male_br_elite_visor.3db as my basis). We will use this as our shell for creating our prop. You will need to make some alterations however. Using the prop_hat_male_br_elite_visor.3db as an example, these are the alterations you need to make to the file as you go down the list:
1. Under the VMeshData Tree, rename the tree labelled data.characters.props.prop_hat_male_br_elite_visor .lod0-112.vms to the name you gave your first group with .lod0.vms added as an extension.
2. Import the VMeshData file you created a moment ago into the VMeshData node under this tree.
3. Under the VMeshPart tree, import the VMeshRef file you created a moment ago into the VMeshRef node that is there.
4. Under the Matieral Library, rename the first material tree (called prop_hat_elite_br in our example) to the name you have given your texture (do not include the extension).
5. Under the tree you just rename, go to the node Dt_Name. Move the menu under 'Interpret Data as' to the variable 'String' and click edit. Replace the words here (prop_hat_elite_br.TGA in our example) with the name you gave your texture, this time including the extension .tga to the end.
6. This prop example has another material contained in its material library, the glass texture. If there are surplus textures, you can just simply delete the entire tree out of the file (it was called prop_hat_elite_brGLASS in our example) as we are only using one texture.
7. Rename the tree under the Texture Library (it is called prop_hat_elite_br.TGA in our example) to the same name as your texture once again with the .tga extension on the end.
8. There is a node under this tree called MIPS. If your textures are in DDS format, select this node and click import and import your dds texture into there. If your texture is in TGA format, rename this node to MIP0 and then highlight the node and import your tga texture.
Once you have done all that, save your prop with a unique name and the extension .3db after it. Congratulations, you have just finished making your prop.
However, the hard work ain't over yet. Indeed, the next step is to get it to line up properly on the head. The only way you can do this is to fiddle around with the 3db file in HardCMP. Once you have followed the next part to put the prop into the ini files, you will need to load up the mod and check it's alignment visually, before unloading the mod, going back into HardCMP and give tiny adjustments to the hardpoint (there is only one hardpoint, hp_hat) and here is the emphasis... tiny. We are talking no more than about 0.01 movements of the hardpoint and you will not be able to clearly see the hardpoint in relation to the model as HardCMP shows the hardpoint as a large cube that will cover the entire model. I found this stage of loading up the mod, checking where the alignment is on the NPC, unloading the mod, making adjustments in HardCMP, saving my work and doing it all again, the most time consuming part of the entire thing of creating a prop. But don't give up, because though it is time consuming and awkward, once it is done, you have completed the prop.
Now, as previousily mentioned, I would talk about the idea of alien heads. The mod developers of Freeworlds who worked on it before me had managed to include several alien head designs, including a Wookie and a Mon Calamari head design. It would appear that they had found a way to alter the mesh of the head at first... but not at all. All they did was make a hat prop in the shape of the alien head that was bigger than the head they were putting it on and lined it up properly. Ok, so the lips won't move when it talks and the eyes won't blink, but otherwise the 'false head' will turn and look around the room like any other as it will move with the real head that is beneath it. This is also how I created the Twi'lek's Lekku (the funny hair thing that grows out of their heads) that you see in the example picture I showed earlier.
This does lead me to an interresting idea.... if a model has it's textures removed, the model is essentially still there but will not show up (note to would be Cloak cheaters - removing the textures from a model will only render it invisible to you, not to anyone else, so don't even try to cheat that way). If you made a head with no textures, the hard point for the head would still exist and move around as normal, but the head won't be visible. You could use this trick to create a 'false head' prop which is then either a different shape or size to a human head without worrying about the human head sticking out of points... I think I will try and make an Ithorian with this technique.
That's it on props. If anyone finds out that there were other prop hardpoints included the game's code, but never actually used, could you let me know so I can look more into it. Next part of the Tutorial deals with implementing your models into the game and which ini files to alter.
Part Three - Implementing the new bodies and props into your ini files
This part of the tutorial will explain how to get your new body parts and props into the mod so you can see and test them. It is a very straight forward and easy stage to complete, especially compared to all off the above. After making sure that you have stored your new parts somewhere in your mod directory (normally somewhere in the characters directory), you will now need to make alterations to just two ini files. These files are:
\DATA\CHARACTERS\bodyparts.ini
\DATA\MISSIONS\mbases.ini
The first step is to decompress these ini files and open the bodyparts.ini up in Notepad. This ini file is used to tell Freelancer which bodyparts and prop models are associated with which nickname. However, where you place the details for each model has to be placed in the correct location (otherwise they could get the wrong animations). As you look through the list though, it should be fairly apparant which bodypart goes where in the list. The groups are:
Male and Robot Body Parts
Female Body Parts
Male Heads
Female Heads
Male Hands
Female Hands
Accessory's (i.e. props)
Lets start with declaring your body parts. If you look at the body part entry, you see that they have only two lines:
[Body]
nickname = li_shipdealer_body <--- change this to the unique nickname you wish to use in the ini files
mesh = characters\bodies\li_shipdealer_body.dfm <--- change this to the path and name of your model file
Just copy and paste in an entry into the correct location as noted above and change the details indicated. Nothing can be simpler. Make note however, that different body parts have different tag titles. You will find there are titles [Body, [Head, [LeftHand and [RightHand so make sure you get the right body part as well for the body part you are declaring.
Next we need to declare your props. This is fairly simalar to the bodyparts, with two more lines added in. A typical entry looks like:
[Accessory]
nickname = comm_rh_wilham <--- change this to a unique nickname you wish to use in your ini files
mesh = characters\commhelmets\comm_rh_wilham.3db <--- change this to the path and name of your model file.
hardpoint = hp_hat <--- keep this unless eyewear
body_hardpoint = hp_hat <--- keep this unless eyewear
If you have created eyewear instead of a hat, change the hp_hat entries to hp_eyewear.
Now save the ini file and open up the mbases.ini file. As mentioned before, I won't go into detail about the mbases.ini file (the file used to add NPC's to space stations and bases) as other people have gone into this in quite some detail before. All I will do is indicate which lines you change to turn an NPC into your new creation:
[GF_NPC]
nickname = MAND01_mandnav_001_m
body = ci_mandalorian1_body
head = im_black_head
lefthand = benchmark_male_hand_left
righthand = benchmark_male_hand_right
individual_name = 80020
affiliation = br_n_grp
voice = rvp111
misn = DestroyMission, 10, 17
room = bar
accessory = prop_hat_ci_manda_helmet1
Here's a typical NPC entry in the mbases.ini file (actually, not so typical, I took it from the Freeworlds mbases.ini file rather than vanilla Freelancers, but the process is the same). The entries you change on your NPC to include your body parts should be fairly obvious. Just use the nicknames you used in the bodyparts.ini file as your entries for body, head, lefthand and righthand. With your props, add the line at the end accessory = followed by the nick name you gave your prop. If you want to include both eye wear and a hat, just add two accessory lines at the end.
It is also worth noting that these customised NPC's can also be used in your NPC ship files and system ini files for station announcers that appear in the little tiny com window that you get when NPC's contact you in space.